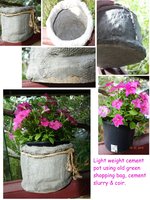
I'm supposed to do stuff that forces me to use my right arm, but I don't think they were thinking along these lines!

Anyway over 2 days and several short sessions I made this pot. Actually typing this post out now hurts my arm and shoulder as much as making the pot did!
I wanted to use the little black 4lt bucket or a different yellow 3kg fertilizer bucket, both aprox same size as they are just right to grow one petunia plant in. You can plant directly into these pots but I found the concrete makes the medium very alkaline.
I also wanted to use up some rotting green shopping bags rather than throw them in the rubbish and risk having the bags rot into 100 million particles all ending up in the environment.
Now those particles are trapped forever inside this concrete where they can do no harm.
So first I found a smaller plastic container which I wrapped plastic bags around to pad it up to the right size, put all that inside a strong plastic bag, then another thin plastic bag that could be ripped apart to get it out of the finished dried pot.
Then I made a slurry of pancake batter consistency using general purpose concrete powder and worked the green bag until covered inside and out with slurry. I cut the handles off after fitting it onto the mould just incase I needed something to help me pull it around into place better.
The slurry began to dry fairly fast which was my cue to make more slurry and coat the outside with a second layer. I also rolled the top down to create the effect of a rolled down hessian bag & added the tie to make the waist.
The next day I made a much stronger concrete mix with added coir for the strengthening agent to make the base which is around 3cm thick and gives the pot stability. After another couple hours I was able to remove all the packing from inside and apply another slurry layer inside the pot. I also removed the tie and fiddled artistically with the shape of the rolled down top and waist. Because the shopping bag had no texture, I cut a piece of shade cloth and used that to press into the partly dried slurry to form the hessian texture on the outside of the pot. I also added the seams down the sides to make it look like hessian bag seams.
Next day it was dry enough to put in position with the pot of flowers in it. I still have to drill a drain hole in the bottom. I could have made it during making but my arms weren't strong enough. All this happened before any of this rain, so the drying conditions were really good and I was working in the shade under the house so no cracks formed. I set my work station up on top of a small volume wheelie bin so I didn't have to bend and I used a big square piece of plywood covered with a similar sized piece of cardboard as the swivel. The finished pot weights around 2.5kg.
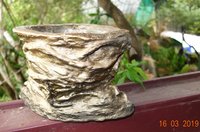
My tools consisted of an old 3inch wide paint brush, an old 10lt plastic basin, a tablespoon from the kitchen and rubber gloves and lots of plastic bags which now reside inside the strong plastic bag so I can use that mould again if wanted. I'm also planning to do a slightly different take on the same process to use up some old threadbare towels which get draped over 20lt buckets to form wavy shaped planter vases.

Last edited:


